Vehicle Physics & an Introduction to Scoreoid
After last weeks introduction to third person cameras we're now going to look at developing a slightly futuristic third person racing game with an online highscore leaderboard thanks to Scoreoid, lets get started.
Please import the project files from BB Wk 8 folder for this lab.
This tutorial should take roughly 3 hours and introduces the following:
Please remember to save your work REGULARLY as the excuse "it crashed" won't get much sympathy. Should you make a mistake CTRL Z / Y provide undo / redo functionality respectively.
1. Vehicle Physics... Urgh.
Some of you may have noticed within the Component -> Physics menu there is a "Wheel Collider" and thought woohoo, awesome, that'll save me loads of time. It's ok, everyone does to start with until you actually try and use it. It's a bit buggy and is real fiddly.
That said there are several significant libraries built on top of Wheel Colliders so we'll look at how they work first and then introduce the libraries afterwards.
1.1 >> Choosing a Vehicle
The main requirement for a vehicle model is that the wheels are all seperate objects and not part of the mesh so you can animate them at a later point - if you want to use any models from elsewhere check this first. Most of the cars on BB are in this format, the ones that aren't are being updated so that they are.
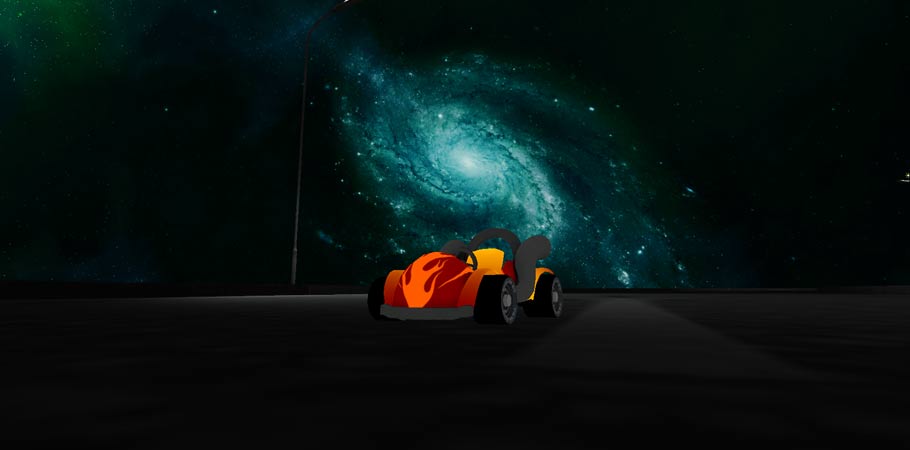
Drag the kart from within the prefab folder onto the road. Unfortunately the person who modelled the kart set the local axis pointing in the wrong direction so our kart will drive backwards - you won't be able to drive far anyway so it's no big deal... hopefully getting this fixed shortly.
Expand the Kart within the Hierarchy and you'll notice 4 wheels and the main 'Kart' chassis. Add a Wheel Collider Component to each of the wheels so that you get a green circle surrounding each of the tyres as below.
NB: You should apply your wheel colliders onto seperate objects, not the wheels you're going to animate. If you setup a car yourself it's worth applying one wheel collider onto an actual wheel to get the correct dimensions and simply place them on empty gameobjects that are in the exact same position as the wheels. We're cutting a corner here to save time since it won't work nicely either way.

Now create a new script, rename it Drive and overwrite the default code with the following:
Toggle Javascript / C#
//JAVASCRIPT

public var fwheelL:WheelCollider;
public var fwheelR:WheelCollider;
public var rwheelL:WheelCollider;
public var rwheelR:WheelCollider;

public var steerMax:float = 30f;
public var motorMax:float = 30f;
public var brakeMax:float = 30f;

public var steer:float;
public var motor:float;
public var brake:float;

/*
 * Convert user input into movement/rotation
 */
function Update ()
{
    // handle the input
    steer = Mathf.Clamp(Input.GetAxis("Horizontal"), -1, 1);
    motor = Mathf.Clamp(Input.GetAxis("Vertical"), 0, 1);
    brake = -1 * Mathf.Clamp(Input.GetAxis("Vertical"), -1, 0);

    // apply torque for movement
    rwheelL.motorTorque = motorMax * motor;
    rwheelR.motorTorque = motorMax * motor;

    // apply the brakes
    rwheelL.brakeTorque = brakeMax * brake;
    rwheelR.brakeTorque = brakeMax * brake;

    // steer
    fwheelL.steerAngle = steerMax * steer;
    fwheelR.steerAngle = steerMax * steer;
}
// C#

using UnityEngine;
using System.Collections;

public class Drive : MonoBehaviour
{
	public WheelCollider fwheelL;
	public WheelCollider fwheelR;
	public WheelCollider rwheelL;
	public WheelCollider rwheelR;

	public float steerMax = 30f;
	public float motorMax = 30f;
	public float brakeMax = 30f;

	public float steer;
	public float motor;
	public float brake;

	/*
	 * Convert user input into movement/rotation
	 */
	void Update ()
	{
		// handle the input
		steer = Mathf.Clamp(Input.GetAxis("Horizontal"), -1, 1);
		motor = Mathf.Clamp(Input.GetAxis("Vertical"), 0, 1);
		brake = -1 * Mathf.Clamp(Input.GetAxis("Vertical"), -1, 0);

		// apply torque for movement
		rwheelL.motorTorque = motorMax * motor;
		rwheelR.motorTorque = motorMax * motor;

		// apply the brakes
		rwheelL.brakeTorque = brakeMax * brake;
		rwheelR.brakeTorque = brakeMax * brake;

		// steer
		fwheelL.steerAngle = steerMax * steer;
		fwheelR.steerAngle = steerMax * steer;
	}
}
All we're doing here is retrieving the users input every frame via Input.GetAxis(..) and then applying it to the wheel colliders via their steerAngle, motorTorque and brakeTorque properties.
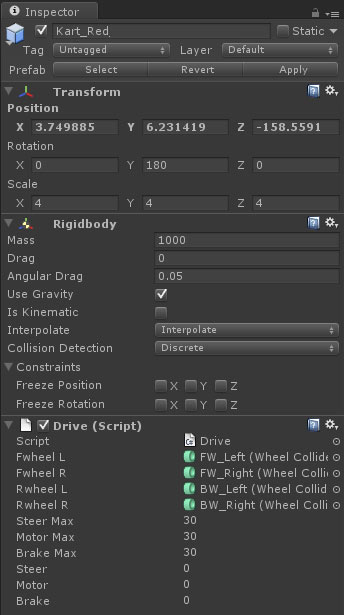
Now add a RigidBody Component at the root level of the Kart, copying the values of the one shown below. Then add the Drive script as a Component too. Finally, drag each of the wheels within the Kart onto the respective variables within the Drive script shown below.
If you want your camera to follow you then assign the target variable of the cameras BasicFollow Component as the kart within the scene.
NB: If your camera doesn't have the BasicFollow script then use one of the Third Person Camera scripts from last week.
Click play and you should be able to control your kart but you'll notice that it's far from usable as it pretty quickly skids and flips over as soon as you attempt to turn. This is a combination of all the friction settings that make up the wheel colliders and depending on the size of the car and how you want it to behave it can take a lot of time adjusting these values literally by 0.01 at a time, to get a usable drive.
The solution? Don't reinvent the (pun intended) wheel.
1.2 >> Prebuilt Solutions
There are a number of libraries out there that are built on the above foundation that provide far more usable vehicle physics, allowing you to get on with building the rest of your game...
- JCar (free)
- Unity Car Tutorial (free)
- Edy's Vehicle Physics (amazing)
For this lab we're going to rip out the car from the Unity Car Tutorial since this should work nicely for us, comes with sound effects and looks better than the JCar Jeep. The UnityCar and EVP libraries really do provide an incredible "driving experience", if you're wanting more polish it's worth taking a look and trying to pick up some hints/tips.
Delete the crappy Kart from the scene and drag the 'car' prefab from the Prefabs/Car folder onto the road. Hookup your camera target again and hit Play. You should be able to drive around the track now just fine but there's no way of knowing when you've finished and if you fall off that's the end of it...
Let's add some checkpoints to fix these issues.
2. Checkpoints
Practically every racing game out there has checkpoints in some form or another however out of nearly a dozen racing games last year only one included them. Checkpoints can be used to prevent cheating since the user has to pass through all the levels checkpoint in order to finish. You can also use them to give feedback to the user about how their doing on that particular stage of the course, particularly if there's multiple laps.
They're also useful for if the user wishes to be respawned as you can start them off from the last known checkpoint.
2.1 >> Create the Checkpoints
First we've got to create some checkpoints which are essentially just epic colliders that stretch across the path of the user. Each will have a script that toggles a boolean when the user passes through and when the count of triggered checkpoints is equal to the total checkpoints then the user has passed through all the checkpoints and the game or lap is over! Lets get started.
Your Turn:
1) First, decide where you're starting line is and position your car in the correct direction in the middle of the track.
2) Next, create an Empty GameObject and rename it "CheckPoints". Set it's position to 0,0,0. Create a new Script, rename it CheckpointController and add it as a Component of "CheckPoints".
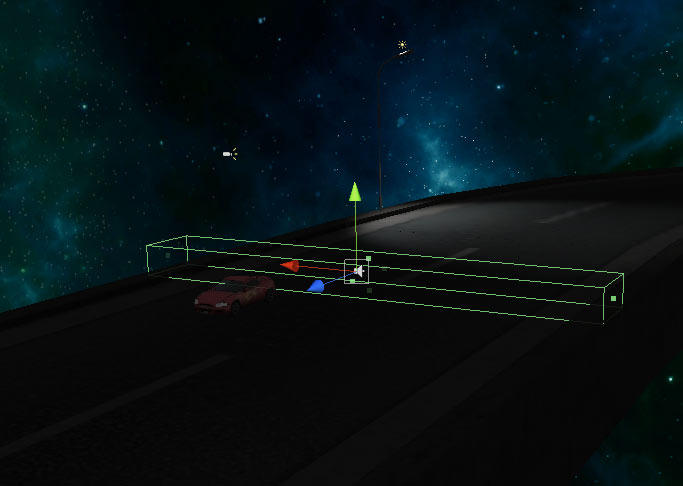
3) Now, create another empty GameObject, rename it "checkpoint" and make it a child of Checkpoints. Add a Box Collider Component with trigger enabled and resize the box collider so it stretches right across the track as below. Position the checkpoint just infront of the car ensuring that it's forward axis (blue arrow) is pointing the same direction as the car.
4) Finally, create a new script, rename it Checkpoint and add it as a Component of the "checkpoint".
5) Now duplicate your checkpoint around the map, I had four, making sure you rotate it around the Y axis so that it's forward axis is always in the direction the player should be travelling. The last one should be behind the car
So, that's checkpoints made.. time to code.
2.2 >> Coding Up
Add the following code to the CheckpointController script and then follow the comments to complete it, except for the last one.
Toggle Javascript / C#
//JAVASCRIPT

public var checkpoints:Array = [];
public var totalCheckpoints:int = 4;


function returnLastCheckpoint():Transform
{
	// return last checkpoint within the arrays transform

}

public function checkpointReached(cp:Checkpoint)
{
	// add checkpoint to array


	// check if level complete
	if (    )
	{
		// trigger upload to scoreoid by adding Component (section 3)

	}
}
// C#

using UnityEngine;
using System.Collections;

public class CheckpointController : MonoBehaviour
{
	public ArrayList checkpoints;
	public int totalCheckpoints = 4;


	public Transform returnLastCheckpoint()
	{
	    // return last checkpoint within the arrays transform
	     return transform;
	}

	public void checkpointReached(Checkpoint cp)
	{
	    // add checkpoint to array

	    // check if level complete
	    if (     )
	    {
	        // trigger upload to scoreoid by adding Component (section 3)

	    }
	}
}
Now, add the following code to the Checkpoint script and then follow the comments to complete it.
Toggle Javascript / C#
//JAVASCRIPT

public var reached:boolean = false;
public var checkpointController:CheckpointController;

function Start()
{
	// retrieve checkpoint controller script

}

function OnTriggerEnter(other:Collider)
{
	// check it's the player we've hit and that we haven't been reached before
	if (   )
	{
		// toggle boolean
		reached = true;

		// invoke the checkpointReached function, passing this script as the parameter

		print("You took: " + Time.time + " seconds");
	}
}
// C#

using UnityEngine;
using System.Collections;

public class Checkpoint : MonoBehaviour
{
	public bool reached = false;
	public CheckpointController checkpointController;

	void Start()
	{
		// retrieve checkpoint controller script

	}

	void OnTriggerEnter(Collider other)
	{
		// check it's the player we've hit and that we haven't been reached before
		if (   )
		{
			// toggle boolean
			reached = true;

			// invoke the checkpointReached function, passing this script as the parameter

			print("You took: " + Time.time + " seconds");
		}
	}
}
Finally, make sure that Car/Collider_Bottom AND Car/Collider _Top are tagged as "Player" so that the car is recognised as the player when it intersects with the collider.
Now when you drive around if you select one of the checkpoints the reach variable should be toggled to true as you pass through. Once you reach the finish you should get a print in the console telling you how long it took you. In the next section we'll push that to a server to store the fastest time and then present it each time someone plays the game.
2.3 >> Falling and Respawning
Okay, this one is all yours.
1) Create an empty Gameobject, position at 0,0,0, rename it "FallOff".
2) Add a BoxCollider with trigger enabled again.
3) Set the Box Collider to be massive, like 1000 x 20 x 1000.
4) Create a new Script, call it FallOffTrack.
5) Code the trigger function so that when the player collides with the box collider their position and rotation are set the to the last checkpoints transform... this is what we created the CheckpointController.returnLastCheckpoint() function for... you might need a Start() function to retrieve the CheckpointController.
Now when you drive off you should be respawned at the last check point, magic! So, now we have our checkpoints working it's time to take a look at Scoreoid...
3. An Introduction to Scoreoid - "The Ultimate Gaming Backend"
Backend is such a dirty word lol.
So far, we haven't collected any data from our games, no high score lists etc... that's a bit rubbish. High scores create competitiveness and can make your game more socialable.
We could store this sort of data locally using PlayerPrefs but using a webservice to store your data in the cloudthis is a more realistic approach and a better approach especially when it's FREEEEEEEEEEEEEEEEEE (Thanks Almog)!
So, go ahead and sign up for an account with scoreoid - NB: use your real email since you have to activate your account, there's no spam =)
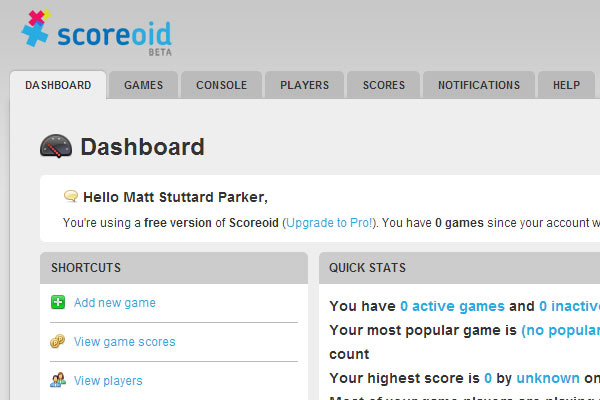
Once you've logged in you'll be presented with your dashboard where you can add games, play with the API within a live "console", edit players delete players, view scores and allsorts of other cool stuff.
We want to start by adding a game so under the Games Tab select Add New Game. Call the game whatever you want, I called mine DrivingGame and put Lab 8 as the details. No-one but you will see these bits...
So, here is the plan.
1) When the game starts in the menu screen we're going to retrieve the shortest time that anyone has played the game for, i.e. the fastest time around the course. We'll then display that on the screen where it currently says "loading..."
2) When the player reaches the final checkpoint we'll then create a new Player entry for our Game (within scoreoid) and set that players "current_time" to the time taken. We'll have lots of player entries with various times - the quickest of which will be shown on the menu page!
So, let's start with the menu page...
3.1 >> Retrieving values from Scoreoid
So we need to retrieve the best time recorded by any player that has played our game. Thankfully scoreoid have thought of this and their API presents us with GetGameLowest. This API call has 4 requirements...
1) Your API Key (we'll locate in a second)
2) The Game ID (we'll locate in a second)
3) The format for your response, XML or JSON
4) The field you want to retrieve the lowest value for, i.e. current_time, gold_collected etc.
Create a new script, rename it BestTimes and copy and paste the following code into your script:
Toggle Javascript / C#
//JAVASCRIPT

public var gui1:GUIText;
public var gui2:GUIText;

/**
	Retrieve the fastest time
*/
function Start()
{
	// set as loading
	gui1.text = gui2.text = "Loading...";

	// scoreoid access url
    var url = "https://www.scoreoid.com/api/getGameLowest";

	/* Unity WWW Class used for HTTP Request */
	var form = new WWWForm();

	// add the fields
    form.AddField( "api_key", "YOUR_API_KEY_HERE" );
    form.AddField( "game_id", "YOUR_GAME_ID_HERE");
	form.AddField( "response", "xml");
	form.AddField( "field", "current_time");

	// retrieve and wait until WWW returns
	var www = new WWW( url, form );
	yield www;

	/**
		returns this XML...


		X
	*/

	// init parser
	var parser = new XMLParser();
	var node = parser.Parse(www.text);

	/* Check for errors */
	if (www.error == null)
	{
	     Debug.Log("BEST TIME: " + node["current_time"][0]["_text"] + "s");
	     gui1.text = gui2.text = "BEST TIME: " + node["current_time"][0]["_text"] + "s";
	}
	else
	{
	    /* Something wrong! */
	    Debug.Log("WWW Error: "+ www.error);
	    gui1.text = gui2.text = "Error Contacting DB!";
	}
}
// C#

using UnityEngine;
using System.Collections;
using System.Collections.Generic;
using System.Text;
using System.Xml;
using System.IO;

public class BestTimes : MonoBehaviour
{
	public GUIText gui1;
	public GUIText gui2;

	/**
		Retrieve the fastest time
	*/
	void Start()
	{
		// set as loading
		gui1.text = gui2.text = "Loading...";

		// scoreoid access url
	    string url = "https://www.scoreoid.com/api/getGameLowest";

		/* Unity WWW Class used for HTTP Request */
		WWWForm form = new WWWForm();

		// add the fields
	    form.AddField( "api_key", "YOUR_API_KEY_HERE" );
	    form.AddField( "game_id", "YOUR_GAME_ID_HERE");
		form.AddField( "response", "xml");
		form.AddField( "field", "current_time");

		// retrieve and wait until WWW returns
		WWW www = new WWW(url, form);
        StartCoroutine(WaitForRequest(www));
	}

	IEnumerator WaitForRequest(WWW www)
    {
        yield return www;

		XmlDocument xmlDoc = new XmlDocument(); // xmlDoc is the new xml document.
		xmlDoc.LoadXml(www.text); // load the file.

		if (www.error == null)
		{
		     gui1.text = gui2.text = "BEST TIME: " + xmlDoc.InnerText + "s";
		}
		else
		{
		    gui1.text = gui2.text = "Error Contacting DB!";
		}
    }
}
There's quite a bit there but nothing too scary.
We use Unity's WWW Class to call any form of webservice and can populate it with POST vars using the WWWForm Class. Once we've instantiated the WWW varaible we use a yield statement to pause the script until the response from the server has been received.
We then instantiate the XMLParser Class which will help parse our XML for us since the native .NET libraries are a pain. If you wish to use JSON instead feel free to do so. We test whether there has been an error using the error flag WWW.error and then update the GUIText text property accordingly.
You need to replace the API Key with your own and the Game ID with your own for the above code to work. You can find your API Key on the Console Tab and your Game ID on the Game Tab once logged into scoreoid.
Finally, attach the script to the best1 GUIText and assign the best1 and best2 GUITexts within the Inspector.
3.2 >> Creating a Player within Scoreoid
So we've setup retrieving the best time but now we need to actually add our players time.
This one is all up to you, the plan is..
1) Create a script called LevelComplete.
2) Within the Start() function create a player within scoreoid with a random username, i.e. "Player2345". Take a look at the Unity example on the CreatePlayer API page to help you along. You'll want to add the time using the optional "current_time" parameter.
3) Within the CheckpointController add the LevelComplete script as a Component when the user have reached the final checkpoint.
Ok, if your code compiles then it's likely correct since the example should give you most of what you need. Play the game and try and make it around the track....Do you get a success message for the player being created? If not, did you fill in your API key and Game ID correctly?
If everything appeared to work then check the scoreoid Players Tab and see whether a new Player has appeared or not. When you run the game from your menu you may get the new players time, assuming it's faster than any previous times...
4. Challenge? (optional)
Finished early? Fancy a challenge? Here are a few ideas to tackle...
1) Multiple Views
One of the key features of a racing game is the ability to swap views whilst playing. Add a couple of different camera views, i.e. Birdseye, Follow, Cockpit/First Person and toggle through them using the 'C' key.
2) Musical Checkpoints
When you pass a checkpoint, make a musical sound or play a voice that says "checkpoint" etc. When the player arrives at the finish, play some cheering sounds.
3) Scoreoid + PlayerPrefs
Instead of recreating usernames each time, cache the username being used using PlayerPrefs and retrieve it each time the game starts. Update your script to then use the UpdatePlayerField API call if a username has been previously stored.
4) My Name Is..
Introduce some input fields so the player can enter their name and then when showing the best time show the players name
5. Conclusion
Hopefully you've had some fun playing with vehicle physics and can see the potential that scoreoid offers as a platform and will maybe integrate it into your coursework. It would be great to see some games with high score lists with players names etc...
Next week we'll look at more advanced AI techniques, playing with Physics and any other bits and pieces you'd like to know...